
Features
- Runs a device for a specified time duration.
- Using the single push button at the bottom left, the duration can be programmed from 1s to ~18hrs and it is saved in EEPROM.
- If the power is interrupted while the timer is on, the remainder is continued when the power comes back.
- Can be converted to a conventional switch by holding down the push button when the timer is powered on. Repeating the same procedure converts the switch back to the previous programmable state.
How to Program
- Hold down the push button to enter setup mode. The green LED turns on when entered.
- Short pressing the push button starts a counter and blinks the green LED.
- Count the number of blinks. Then the next short press takes the count as seconds or a long press takes it as minutes and stores in EEPROM.
How to Use
- Short pressing the push button turns the switch on for the pre-programmed duration.
- A short press can preempt a running switch.
Schematic
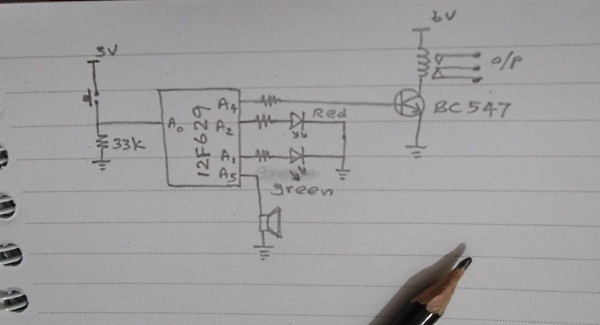
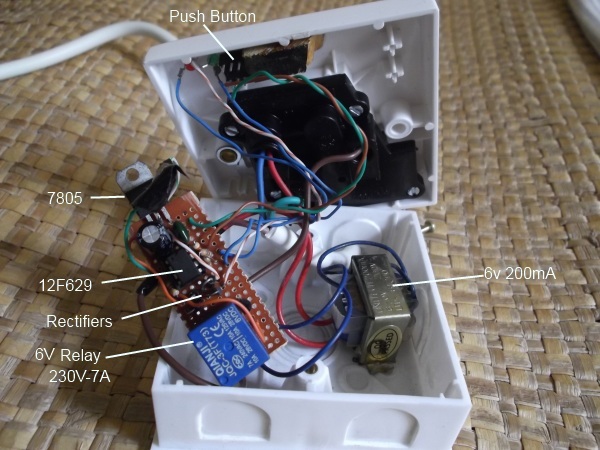
Power supply: 6v-200mA transformer -> Rectifier Bridge -> Filter caps -> 7805
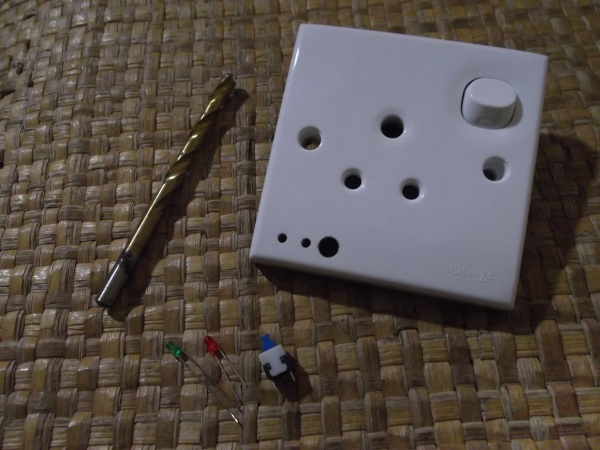
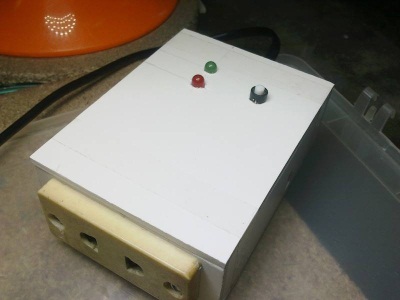
Plug base drilled for LEDs and push button.
The ugly inside.
Program: (CCS-C)
#include <12F629.h>
#FUSES NOWDT //No Watch Dog Timer
#FUSES INTRC_IO //Internal RC Osc, no CLKOUT
#FUSES NOCPD //No EE protection
#FUSES NOPROTECT //Code not protected from reading
#FUSES MCLR //Master Clear pin enabled
#FUSES NOPUT //No Power Up Timer
#FUSES NOBROWNOUT //No brownout reset
#use delay(int=4000000)

#define PUSH_BTN    PIN_A0
#define SETUP_LED   PIN_A1
#define RUN_LED     PIN_A2
#define RELAY       PIN_A4
#define SPEAKER     PIN_A5
#define DEBOUNCE_DELAY   30 // ms
#define SHORT_PRESS      1
#define LONG_PRESS       2
#define RELEASE_TIME_OUT 3 // took too long to release
int16 gi_TimerDuration = 0; // The switch is kept on this amount of seconds
int16 gi_Remaining = 0; // Number of seconds remaining to switch off
//------------------------------------------------------------------------------
void PerSecond() // This gets called per second
{
    if (gi_Remaining > 0)
    {
        gi_Remaining--;

        // In each ~32 seconds, save remainder to continue automatically after a power outage
        if ((gi_Remaining & 0x1f) == 0)
        {
             write_eeprom(2, gi_Remaining & 0xff);
             write_eeprom(3, gi_Remaining >> 8);
        }

        // Toggle Running indicator at last 10s
        //if (gi_Remaining < 10)
        // output_bit(RUN_LED, gi_Remaining & 0x1);
    }
    else if (gi_Remaining == 0)
    {
        output_low(RELAY);
        output_low(RUN_LED);
    }
}
//------------------------------------------------------------------------------
int16 time = 0; // driven by timer0
#INT_TIMER0
void isr_timer0_overflow()
{
    time++;
    if (time < 3840)
       return;

    time = 0;
    PerSecond();
}
//------------------------------------------------------------------------------
void WaitForButtonPushDown()
{
    while (true)
    {
        int n;
        int i;

        while (input_state(PUSH_BTN) == 0)
            continue;

        // Some times this is sensitive to power glitches.
        // Read consecutive 5 HIGHs to verify.
        n = 0;
        for (i = 0; i < 5; ++i)
        {
             n += input_state(PUSH_BTN);
             delay_us(200);
        }

        if (n == 5) // OK. we are satisfied
            break;
    }

    delay_ms(DEBOUNCE_DELAY);
}
//------------------------------------------------------------------------------
int WaitForButtonReleaseOrTimeout()
{
    int16 t;

    // Wait till release or time out
    t = 0;
    while (input_state(PUSH_BTN) == 1)
    {
         output_high(SPEAKER);
         delay_us(300);
         output_low(SPEAKER);
         delay_us(300);

         if (t == 500) // 1500 // ~1s time out
             return RELEASE_TIME_OUT;

         t++;
    }
    delay_ms(DEBOUNCE_DELAY);

    if (t < 300) // less than half a second
        return SHORT_PRESS;
    else
        return LONG_PRESS;
}
//------------------------------------------------------------------------------
int WaitForButtonPress()
{
    WaitForButtonPushDown();
    return WaitForButtonReleaseOrTimeout();
}
//------------------------------------------------------------------------------
void DoTheJob()
{
    if (gi_TimerDuration == 0) // holiday
        return;

    // Start new service cycle
    gi_Remaining = gi_TimerDuration;
    output_high(RELAY);
    output_high(RUN_LED);
}
//------------------------------------------------------------------------------
void StopTheJob()
{
    if (gi_Remaining == 0) // already stoped
        return;

    gi_Remaining = 0;
    output_low(RELAY);
    output_low(RUN_LED);

    write_eeprom(2, 0);
    write_eeprom(3, 0);
}
//------------------------------------------------------------------------------
void RunSetup()
{
    int16 seconds;
    int16 t;
    int a;

    // Enter the setup mode
    output_high(SETUP_LED);

    // If we entered here in case of a timeout, Wait until button release
    while (input_state(PUSH_BTN) == 1)
        continue;
    delay_ms(DEBOUNCE_DELAY);

    // Wait for a short press to start reading the duration input from user
    a = WaitForButtonPress();
    if (a == LONG_PRESS || a == RELEASE_TIME_OUT)
    {
        // Exit setup mode
        output_low(SETUP_LED);

        // Wait until release in case of a timeout
        while (input_state(PUSH_BTN) == 1)
            continue;
        delay_ms(DEBOUNCE_DELAY);

        return;
    }

    // Short press.
    // Read user input in seconds (i.e. time till next push down)
    seconds = 0;
    t = 0;
    while (input_state(PUSH_BTN) == 0)
    {
        delay_ms(7);// 10
        t++;
        output_bit(SETUP_LED, t > 90 ? 1 : 0);

        if (t == 100) // 1s
        {
            t = 0;
            seconds++;
        }
    }
    delay_ms(DEBOUNCE_DELAY);

    output_high(SETUP_LED); // as this LED is used above for 1Hz blink

    // Wait for a press to complete reading the duration input from user
    a = WaitForButtonReleaseOrTimeout();
    if (a == LONG_PRESS || a == RELEASE_TIME_OUT) // input in minutes
        gi_TimerDuration = seconds * 60; // Read minutes in seconds
    else if (a == SHORT_PRESS) // input is in seconds
        gi_TimerDuration = seconds;

    write_eeprom(0, gi_TimerDuration & 0xff);
    write_eeprom(1, gi_TimerDuration >> 8);

    // Exit setup mode.
    output_low(SETUP_LED);
    // Wait until release
    while (input_state(PUSH_BTN) == 1)
        continue;
    delay_ms(DEBOUNCE_DELAY);
}
//------------------------------------------------------------------------------
void main()
{
    int switch_mode; // Regular or Timer

    setup_timer_0(RTCC_INTERNAL | RTCC_DIV_1);

    output_high(RUN_LED);
    output_high(SETUP_LED);
    delay_ms(100);

    output_low(RELAY);
    output_low(RUN_LED);
    output_low(SETUP_LED);
    delay_ms(1000); // env stabilization

    // EEPROM
    // Byte [0,1] -> gi_TimerDuration
    // Byte [2,3] -> gi_Remaining
    // Byte [4] -> switch_mode. 1=Regular Switch, else=Timer Switch

    switch_mode = read_eeprom(4);

    // This is to switch between Regular and Timer modes. Hold down the button
    // when micro is powered on.
    if (input_state(PUSH_BTN) == 1)
    {
        // Wait until release
        while (input_state(PUSH_BTN) == 1)
        {
             output_high(SPEAKER);
             delay_us(300);
             output_low(SPEAKER);
             delay_us(300);
        }
        delay_ms(DEBOUNCE_DELAY);

        // user wants to toggle the switch mode
        if (switch_mode == 0)
            switch_mode = 1;
        else
            switch_mode = 0;

        write_eeprom(4, switch_mode);
    }

    if (switch_mode == 1)
    {
        // Regular switch

        output_high(RELAY);
        output_high(RUN_LED);

        while (TRUE)
            continue;
    }

    // Starting Timer mode.

    // Read saved configurations
    gi_TimerDuration = read_eeprom(1);
    gi_TimerDuration = gi_TimerDuration << 8 | read_eeprom(0);
    gi_Remaining = read_eeprom(3);
    gi_Remaining = gi_Remaining << 8 | read_eeprom(2);

    // Continuity after power outage.
    // Note: we save this in each 32s. so there can be a error of 32s.
    if (gi_Remaining >= 32) // not going to continue remainders of less than 32s
    {
        // little compensation (error / 2) may be preferred.
        gi_Remaining -= 16;
        output_high(RELAY);
    }
    else
        gi_Remaining = 0;

    enable_interrupts(GLOBAL);
    enable_interrupts(INT_TIMER0);

    while (TRUE)
    {
        int a;
        a = WaitForButtonPress();
        if (a == SHORT_PRESS)
        {
            if (gi_Remaining > 0)
                StopTheJob();
            else
                DoTheJob();
        }
        else if (a == LONG_PRESS || a == RELEASE_TIME_OUT)
        {
            RunSetup();
        }
    }
}
//------------------------------------------------------------------------------
Troubleshooting
- EEPROM of the microcontroller should be cleared when it is first programmed.
- MCLR pin should be kept grounded. If this is not done LEDs will flash rapidly.
- Verify your circuit using a simple program. Check LEDs are blinking, switch is working, buzzer is working.
- If it still does not work, hold the switch down while power is on. This toggles the behaviour of the switch from programmable to non-programmable and vice versa.
How Others Did
Pavel from Bangladesh has made his own version with some extended features.


Hai sir
Your project is good
Please send me hex file
My Email:pradeeshtva@gmail.com
Thanku sir
Your hexfile is working
Olá, Boa Noite! Belo Projeto! Parabéns. Teria como enviar o código HEX para o meu email? rogereletronic@yahoo.com Muito obrigado. Atenciosamente Rogério Guerra
This is the hex file
:1000000000308A003A280000831A0A28A500030E4F
:10001000A6000F288312A500030EA600A6140A0846
:10002000AD008A018313A50E0408A7002008A800CC
:100030002108A9002208AA002308AB002408AC006C
:1000400083128B1E25280B194028270884002808B6
:10005000A0002908A1002A08A2002B08A3002C0850
:10006000A4002D088A00260E83008312250EA618F0
:1000700083160900FF238316900000308A002A2A85
:10008000B20A0319B30A33080E3C0318A228B301BD
:10009000B201B008031D4F28B10803199428300895
:1000A0000319B103B00330081F39C000C101C008F3
:1000B000031D9328C108031D93283008C000C10107
:1000C000023083169B008312300883169A001C1599
:1000D00083120B08A0008B13831655309D00AA30A5
:1000E0009D009C149C1872281C11831220088B04FC
:1000F0003108C000C101033083169B008312310810
:1001000083169A001C1583120B08A0008B1383160C
:1001100055309D00AA309D009C149C188D281C1100
:10012000831220088B04A228B008031DA228B1085E
:10013000031DA228831605128312051283160511CA
:10014000831205110B118A1125283D308400000807
:100150000319B8280130A100A001A00BAD28A10B04
:10016000AC284A30A000A00BB328B628800BAA28E0
:100170000034BC01BB01051CDE28831685128312E6
:1001800085166330A000A00BC328C62883168512ED
:10019000831285126330A000A00BCC28CF283B0827
:1001A000B83C031DDA283C080B3C031DDA28033059
:1001B000A100F228BB0A0319BC0ABB281E30BD00EF
:1001C000A5203C08093C031CEF28031DEB283B0835
:1001D000C33C031CEF280130A100F228F2280230B2
:1001E000A100F22800340518F728F328F328BB01F2
:1001F000BC013C08043C031C0829003005180130F0
:10020000BB074230A000A00B03290000BC0AF9285C
:100210003B08053C03190D29F3281E30BD00A5201D
:10022000B92021080034B008031D1929B1080319A9
:100230004D29B101B00183160512831205128316F0
:10024000051183120511023083169B009A011C15BB
:1002500083120B08A0008B13831655309D00AA3023
:100260009D009C149C1832291C11831220088B04B9
:10027000033083169B009A011C1583120B08A00003
:100280008B13831655309D00AA309D009C149C183A
:1002900047291C11831220088B04FB2AAE08031D7A
:1002A0005429AF08031960292F08B1002E08B000A7
:1002B0008316051283120516831605118312051580
:1002C000FB2A8316851083128514051C692965296C
:1002D00065291E30BD00A520F3202108BA003A0888
:1002E000023C031977293A08033C031D832983162E
:1002F000851083128510051C7F297B297B291E30E0
:10030000BD00A520292AB701B601B901B801051819
:10031000B1290730BD00A520B80A0319B90AB908E8
:10032000031D962938085A3C03189929A301013066
:100330009B29A30100302304031DA0298510A129B6
:1003400085148316851083123808643C031DB02978
:10035000B908031DB029B901B801B60A0319B70AD3
:1003600087291E30BD00A5208316851083128514B1
:10037000B9202108BA003A08023C0319C3293A08F7
:10038000033C031DE3293708BC003608BB00BE014F
:100390003C30BD001030BF00A001A301BC0CBB0C61
:1003A000031CD8293D08A0070318A30A3E08A30789
:1003B000A30CA00CA20CA10CBF0BCE292208AF00ED
:1003C0002108AE00E9293A0BE9293708AF003608C1
:1003D000AE002E08BB00BC0183169B0183122E08C1
:1003E00083169A001C1583120B08A0008B1383162A
:1003F00055309D00AA309D009C149C18FD291C11AD
:10040000831220088B042F08BB00BC010130831627
:100410009B0083122F0883169A001C1583120B0869
:10042000A0008B13831655309D00AA309D009C14AC
:100430009C18182A1C11831220088B04831685101F
:1004400083128510051C262A222A222A1E30BD006E
:10045000A520052B84011F3083051F1383161F1051
:100460009F101F119F11073083129900AE01AF0139
:10047000B001B101B201B30183160108C7390838D0
:1004800081000511831205158316851083128514CA
:100490006430BD00A5208316051283120512831651
:1004A00005118312051183168510831285100430FF
:1004B000B600FA30BD00A520B60B592A04308316C9
:1004C0009B009C131C141A088312B400051C9F2A5D
:1004D000051C7D2A83168512831285166330A000C1
:1004E000A00B702A732A831685128312851263303B
:1004F000A000A00B792A7C2A682A1E30BD00A52006
:10050000B408031D862A0130B400872AB4010430E0
:1005100083169B008312340883169A001C158312DD
:100520000B08A0008B13831655309D00AA309D0048
:100530009C149C18992A1C11831220088B04340BDC
:10054000AB2A831605128312051683160511831232
:100550000515A92AA92A013083169B009C131C1497
:100560001A088312AF01AE002E08B700B601831639
:100570009B019C131C141A0883123604AE00370822
:10058000AF00033083169B009C131C141A088312BF
:10059000B101B0003008B700B601023083169B00ED
:1005A0009C131C141A0883123604B0003708B100DB
:1005B000B108031DDF2A30081F3C0318EA2A103057
:1005C000B0020030031C0130B10283160512831201
:1005D0000516EC2AB101B001C0308B048B16F32054
:1005E0002108B500350BFC2AB008031DF92AB10813
:1005F000031D13294E29052B3508023C0319042B32
:0E0600003508033C031D052B6129EF2A63001A
:02400E00B431CB
:00000001FF
;PIC12F675
Hi,
Am a noob and trying to build this switch… I got a PIC12F675 with PICKIT2 for programming.
I have copied the above hex and uploaded to the PIC using PICKIT2 and it showed successfully programmed.
I constructed the circuit as per the diagram above over a breadboard and used 10k resistor for relay and 330ohm for diodes.. When powered through an Arduino Unos (5v and gnd) for testing, Its buzzing continuously and relay latched, no response when switch is pressed. LEDs not glowing.
Where did I went wrong?
I connected push button to IC pin 7, Setup led to pin 6, Run led to Pin 5, Relay to pin 3 and push button to pin 2 (along with 33k)..
appreciate any help..
Thanks
I have hooked pin 1 to GND and 8 to 5Vof the pic… hope its correct, also used bc547 to drive the relay…
Hai balu I am pradeesh
You must connect 1k resistor pin numbers 4 microcontroller From +5volt